UPnP
MikroTik RouterOS supports Universal Plug and Play (UPnP) architecture, which enables transparent peer-to-peer network connectivity between personal computers and network-enabled devices or appliance.
UPnP allows data communication between any two devices under the command of any control device on the network. This technology is completely independent of any particular physical medium. It supports networking with automatic discovery, meaning a device can dynamically join the network without any initial configuration. DHCP and DNS servers are optional and will be used if available on the network. UPnP implements a simple yet powerful NAT traversal solution that enables clients to get full two-way peer-to-peer network support from behind a NAT.
There are two interface types for UPnP: internal (the interface where local client devices are connected) and external (the interface connected to the Internet). A router may only have one active external interface with a 'public' IP address, and as many internal interfaces as needed, all with source-NATted 'internal' IP addresses. The protocol works by creating dynamic NAT entries rules.
The UPnP internal interface can create NAT mapping for any subnet, not just the subnet present on the internal interface, so caution must be used when setting the internal interface.
The UPnP protocol is used by many modern applications, such as most DirectX games, as well as for various Windows Messenger features like remote assistance, application sharing, file transfer, voice, and video communication from behind a firewall.
Configuration
General properties
Sub-menu: /ip/upnp
| Property | Description |
|---|---|
| allow-disable-external-interface (yes | no; Default: yes) | Whether or not the users are allowed to disable the router's external interface. This functionality (for users to be able to turn the router's external interface off without any authentication procedure) is required by the standard, but as it is sometimes not expected or unwanted in UPnP deployments which the standard was not designed for (it was designed mostly for home users to establish their own local networks), you can disable this behavior |
| enabled (yes | no; Default: no) | Enable UPnP service |
| show-dummy-rule (yes | no; Default: yes) | Enable a workaround for some broken implementations, which are handling the absence of UPnP rules incorrectly (for example, popping up error messages). This option will instruct the server to install a dummy (meaningless) UPnP rule that can be observed by the clients which refuse to work correctly otherwise |
If you do not disable the allow-disable-external-interface, any user from the local network will be able (without any authentication procedures) to disable the router's external interface.
UPnP Interfaces
Sub-menu: /ip/upnp/interfaces
| Property | Description |
|---|---|
| interface (string; Default: ) | Interface name on which uPnP will be running |
| type (external | internal; Default: no) | UPnP interface type:
|
| forced-external-ip (Ip; Default: ) | Allows specifying what public IP to use if the external interface has more than one IP available. |
In more complex setups with VLANs, where the VLAN interface is considered as the LAN interface, the VLAN interface itself should be specified as the internal interface for UPnP to work properly.
Configuration Example
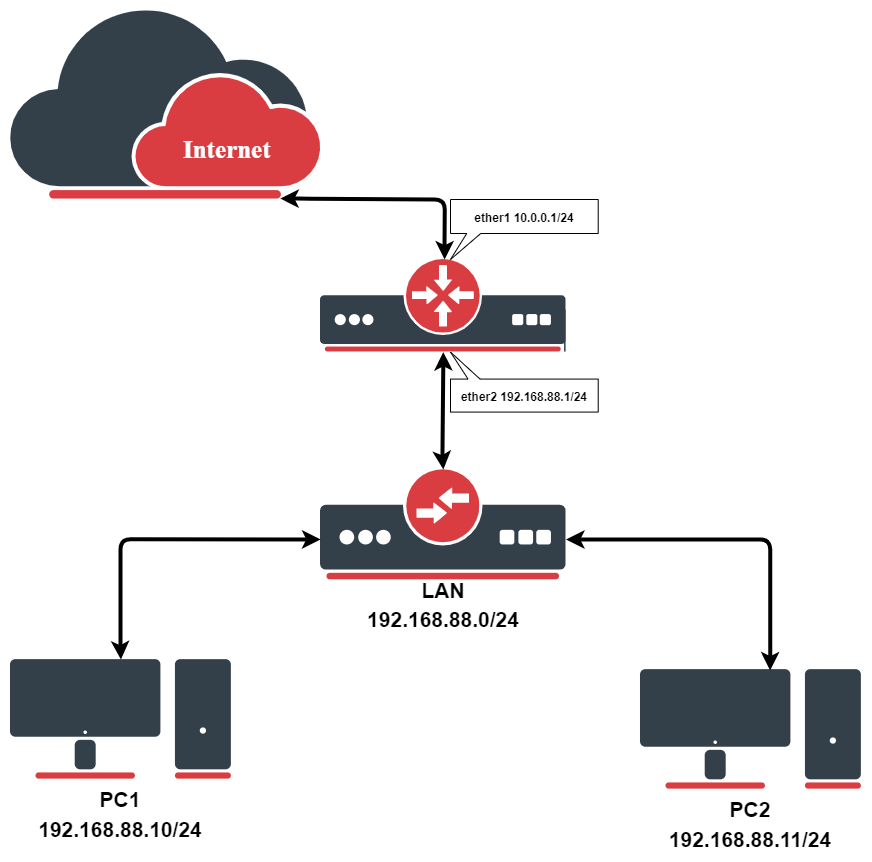
We have masquerading already enabled on our router:
[admin@MikroTik] /ip/upnp> /ip/firewall/src-nat/print
Flags: X - disabled, I - invalid, D - dynamic
  0   chain=srcnat action=masquerade out-interface=ether1
[admin@MikroTik] /ip/upnp>
To enable the UPnP feature:
[admin@MikroTik] /ip/upnp> set enable=yes
[admin@MikroTik] /ip/upnp> print
enabled: yes
allow-disable-external-: yes
show-dummy-: yes
[admin@MikroTik] /ip/upnp>
Now, all we have to do is to add interfaces:
[admin@MikroTik] /ip/upnp/interfaces> add interface=ether1 type=external
[admin@MikroTik] /ip/upnp/interfaces> add interface=ether2 type=internal
[admin@MikroTik] /ip/upnp/interfaces> print
Flags: X - disabled
  #   INTERFACE TYPE
  0 X ether1    external
  1 X ether2    internal

[admin@MikroTik] /ip/upnp/interfaces> enable 0,1
Now once the client from the internal interface side sends a UPnP request, dynamic NAT rules will be created on the router, example rules could look something similar to these:
[admin@MikroTik] > print
Flags: X - disabled, I - invalid, D - dynamic
0 chain=srcnat action=masquerade out-interface=ether1
1 D ;;; upnp 192.168.88.10: ApplicationX
chain=dstnat action=dst- to-addresses=192.168.88.10 to-ports=55000 protocol=tcp
dst-address=10.0.0.1 in-interface=ether1 dst-port=55000
2 D ;;; upnp 192.168.88.10: ApplicationX
chain=dstnat action=dst- to-addresses=192.168.88.10 to-ports=55000 protocol=udp
dst-address=10.0.0.1 in-interface=ether1 dst-port=55000